
Help Page
Welcome to Open Source Photo Gallery - our new photo library program, which replaces Perfect
Pictures
Open Source Photo Gallery has been developed especially for KHS by volunteer Peter Lenehan, with
guidance and testing by Ralph Davis.
PLEASE PROVIDE FEEDBACK ON ANYTHING! Email webmaster@khs.org.au
(or contact Ralph Davis in some other way if you prefer) with suggestions for
usability improvement, and any useful features that you would like to see.
Find any photos with incorrect data? Please let Ralph know.
- All images and data from Perfect Pictures (more than 15,000 records) have
been imported into Open Source Photo Gallery, and new photos are no longer being added to Perfect
Pictures.
- All Perfect Pictures filenames (usually a six-digit number) have been transferred
across to Open Source Photo Gallery. The Open Source Photo Gallery numbering will be the same as for Perfect Pictures,
with the first two digits representing the year in which the photo was added
to Open Source Photo Gallery.
- Initially (and whenever you click the red Reset button)
the screen displays the most recently added/edited, photos. This is a quick
way of seeing which new/updated photos have been added to Open Source Photo Gallery.
How to Search in Open Source Photo Gallery
- As Open Source Photo Gallery works in a web browser, you should find that using it is quite intuitive
- just like searching a website.
- Searches are not case-sensitive, and all commas and single
apostrophes are ignored (you can type them, but you don't need to).
- Unlike Google, double apostrophes are not used
to indicate phrases. They are searchable, just like ordinary letters and numbers.
- The Search box supports three (soon to be four) different Search modes.
These allow you to control how closely the results match the words you enter.
- When you click the light blue Search button, your search
terms will be highlighted in yellow on the screen. [Known bugs: occasionally
the highlighting does not appear; and sometimes parts of words are highlighted
when they should not be - these will be addressed in an update]
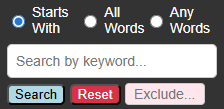
Starts With
- Starts With is the default search option.
- It returns results containing the exact phrase you typed, plus any longer
phrases that begin with those words.
- Do not use double-quotes to enclose phrases - just type the phrase.
- Hint: this is the most useful search for street names. Rather than
typing Tryon Rd or Tryon Road (which would
limit your results to either of those spellings), just type Tryon,
which will return all results for both.
- Remember: Open Source Photo Gallery defaults to Starts With whenever you click
the red Reset button.
All Words
- All Words returns results that contain every word you enter, in any order.
- Example: entering presbyterian uniting will match
items containing both presbyterian and uniting,
regardless of where (or in which order) they appear.
- Hint: use All Words when searching for an address, since sometimes
addresses are written with the house number before the street name,
and sometimes after it.
- Hint: when searching for addresses, leave out road, street,
boulevard, circuit etc. This is because often they will
have been abbreviated to rd, st, bvd, cct
etc, which may unintentionally limit your search results.
Any Words
- Any Words returns results that contain at least one of the words
you enter.
- Example: entering parade band scouts will match
any item that contains one or more of these words.
- Hint: Any Words may return a lot of results, many of which will
not be relevant.
Excluding Words
- You can exclude words or phrases from your search by typing them into the
pink Exclude box, just under the main Search box.
- Example: entering St Johns into the main Search
box and church into the Exclude box will not return
any results for St John's Church, but will still return results for eg. St
Johns Avenue.
How to View the full-size image, and Print it
- The photos you initially see on the main Gallery page are just small 'Photo
Cards' which are reduced in size to fit onto the screen neatly.
- To see the full-size version, click on the photo.
- This will open the 'Viewer' at the top of the screen, as well as expanded
details that are easier to read.
When you see the larger version in the Viewer, you may zoom in if
you wish, by:
- Placing your mouse over the photo (no need to click it).
- Press and hold down the Ctrl button on your keyboard.
- Then use the scroll wheel on your mouse to zoom in and out.
Hint: if you click and hold down your mouse button, you can also
drag the photo around to get a closer look at any part of it you wish.
- Optional: if you wish to reset the photo to its original size,
click the green Reset Zoom button.

There are also two other buttons:
- The orange Close button closes the large Viewer image.
- The blue Print button opens the Print dialog.
Your own personal 'Photo Collection'
This is one of the best features of Open Source Photo Gallery! Every time you click on a Photo Card
to open it in the Viewer, that photo is automatically added to a temporary 'Collection'.
You can view this Collection by clicking on the blue Collected Photos
button, just under the search box.

Your Collection will then open in a new browser tab. When looking at your Collection,
you may select any, or all, of your photos to be printed at the same time.

Note: when you have finished your Open Source Photo Gallery session, please click the red
Clear Collection button on the Collection page (or the similar
button on the main Photo Gallery page).
Additional Hints
What are the coloured icons on the Photo Cards for?

- You can click the orange Hide icon to temporarily hide
that Photo Card from your search results. This is to give you the option of
hiding any search results which are irrelevant.
Note: everything will be unhidden again as soon as you click the
red Reset button below the Search box.
- You can click the green down-arrow icon to save the image
to the Downloads folder, from where you may transfer it to a USB stick. It
will only be the low-res image, not the uncompressed original from the P drive.
Icons at bottom left of screen

- The triangle icon toggles expanded Photo Card details (try
it!).
- The Help button (or the keyboard
F1 button)
opens this Help page.
- The grearwheel icon is for admins to login to upload, edit
or delete photos.
Icons at bottom right of screen

- Clicking the blue Top button quickly returns you to the
top of the page, to save you all that hard work of having to scroll.
- You can choose to display 20, 50 or 100 Photo Cards per page.
Buttons at bottom middle of screen

If your search produces too many results to fit on one page, use these buttons
to move between pages.
If anything requires extra or clearer explanation, just let Ralph know,
so that this page can be updated!